What is in this guide
Label the lunchbox base, detachable lid and bottle body separately, using the name format your school requests. Then teach your child to check those pieces before leaving the eating area. Labelling lunchboxes and drink bottles gives a finder an owner to identify; it cannot guarantee that everything comes home.
Start with the name your school can use
Check the school handbook before writing a batch of labels. Do not assume initials will meet its requirements. St Columba Anglican School, for example, asks for a child’s full name rather than initials on clothing and equipment. Follow your own school’s directions about wording and placement.
Write clearly enough that someone unfamiliar with your child can read the name. If the school requests a class, put that on a separate small label so you can update it at the start of the next year without replacing the main name label.
For shared household containers, decide who is taking each one before packing. Cover or replace an old sibling’s name so the item has one current owner. Keep spare labels with the lunch gear instead of somewhere you must search during the morning rush.
Lay out everything that can come apart
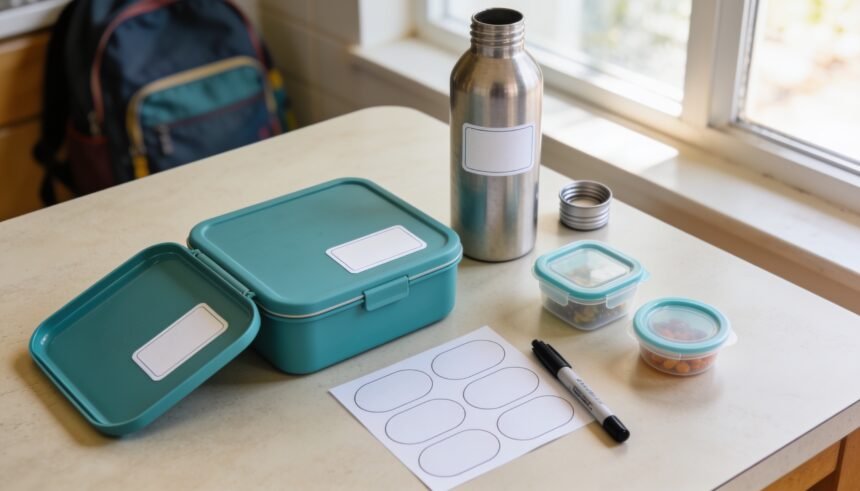
Open the lunchbox and set out its detachable lid, snack tubs and any separate containers that go to school. Put the drink bottle beside them with its removable cap. Treat each piece as something that might arrive at lost property on its own.
Use this placement plan as a starting point, adapting it to the manufacturer’s instructions:
- Lunchbox base: choose a smooth external patch that you can see when turning the box over.
- Detachable lunchbox lid: add its own name instead of relying on the base label.
- Snack tubs: label each base and, where there is suitable space, each separate lid.
- Bottle body: choose a smooth area away from the drinking opening, moving parts and any removable sleeve.
- Bottle cap: add a small label only where it fits without crossing the thread, seal or hinge.
Keep labels out of food compartments and off drinking surfaces. Leave care markings visible. If a small component has no suitable position, do not force a sticker across a working part; make putting it back into its parent container part of the packing check.
This is a labelling plan, not a way to fix a poor seal. For that separate problem, see the guide to leakproof lunchboxes.
Apply labels when the gear can stay unused
Read the instructions supplied with your labels before starting. Stuck On You specifies a clean, dry, smooth, flat surface and firm pressure to remove air bubbles. It also warns that some patterned, ridged or greasy plastics, including some high-silicone surfaces, may be incompatible.
Wash the intended area according to the container’s care instructions, let it dry completely and choose a patch where the whole label can sit flat. Avoid spanning a join or wrapping a large sticker around a tight curve. Press it down as directed, checking the edges before setting the item aside.
Allow the label maker’s stated waiting period before washing. Stuck On You specifies at least 48 hours for its stick-on labels; that is an example, not a universal timing rule. If tomorrow’s bottle cannot stay unused for the required period, label a spare or schedule the job for a break in use.
Check both sets of washing instructions
A label’s dishwasher claim does not establish whether the bottle or lunchbox belongs in a dishwasher. Check the care instructions for both, including any different rules for lids and bodies.
Stuck On You describes its waterproof labels as dishwasher suitable but advises avoiding the hottest settings. That claim applies to its labels, not every sticker. Do not change a container’s required care routine simply to preserve a label; choose a compatible labelling method instead.
After washing and drying, read the name and check for lifting edges. Replace an unreadable or peeling label, following the container maker’s removal guidance rather than scraping or trying solvents on guesswork.
Practise bringing back the complete set
Ask your child to point out their lunchbox and bottle, open them, then pack everything away. An optional matching colour or simple symbol can be a recognition cue alongside the written name. Avoid relying on colour alone to identify ownership.
Give the child a concrete check: bottle, box, lid and snack tub. Practise with the actual school bag so every piece has a place. At home, check the returned set while unpacking, when you can identify exactly what is missing.
If something stays at school, ask where lunch gear is collected and when families can check it. St Columba’s procedure includes specific access arrangements and weekly disposal of food-containing items, so do not assume lost property holds everything until term’s end. Your school’s rules are the ones to follow.
For the wider preparation list, use the back to school checklist. Start this job by laying out tomorrow’s lunch gear and checking every separate piece for a readable name.
The one-page family week
One printable page that holds the whole week: meals, school, activities and who is doing the pickup. Free, and we send one useful email a week.
One email a week. No spam, unsubscribe in a click.